
AI assistant
You can connect your own AI assistant (Claude.ai, ChatGPT, Claude Code, or any tool that speaks MCP, the Model Context Protocol; Cursor connects with a key) to Mergify. Once connected, you can ask it things like “which of my open orders should be merged?” or “merge the orders Mergify suggests for Jane Doe”, and it works on your store through Mergify.
Everything is set up on one page, Settings › AI assistant: the address to add, your keys, the assistants that are connected and what they changed.
Mergify doesn’t search your orders for the assistant. It takes orders from a Mergify suggestion, or from another tool that gives it Shopify order IDs.
You can connect before you have a plan, but merging and suggestions need one: without a plan the assistant is told your store has none. The assistant can help you choose a plan.
What the assistant can do
Section titled “What the assistant can do”- Read your merge suggestions and your merge history.
- Preview a merge (what the merged order will look like, what is refunded, any warning) and run it.
- Read your current plan and the plans Mergify offers.
- Read and change your configuration: merge settings, filtering and grouping rules, Automerge, the customer email sent after a merge (on or off, and its subject) and integrations (ShipStation, ShipBob, ShipSavvy).
- Choose or cancel a plan.
Merges made through your assistant are billed exactly like merges made in the app: the same plan, the same included merges, the same usage charge. Merging cancels or archives the original orders according to your Merge settings, so ask your assistant to show you the preview before it runs a merge. If a merge would be charged past your usage cap, it isn’t run, and the assistant can’t raise the cap: you do that on Plan & usage.
Some of these changes act at once, so ask your assistant to tell you what will change before it does it:
If your assistant says Mergify can’t reach Shopify for your store, open Mergify once in your Shopify admin, then try again.
Connect
Section titled “Connect”The address to add to your assistant is on Settings › AI assistant, with a Copy button:
https://api.mergify.app/mcp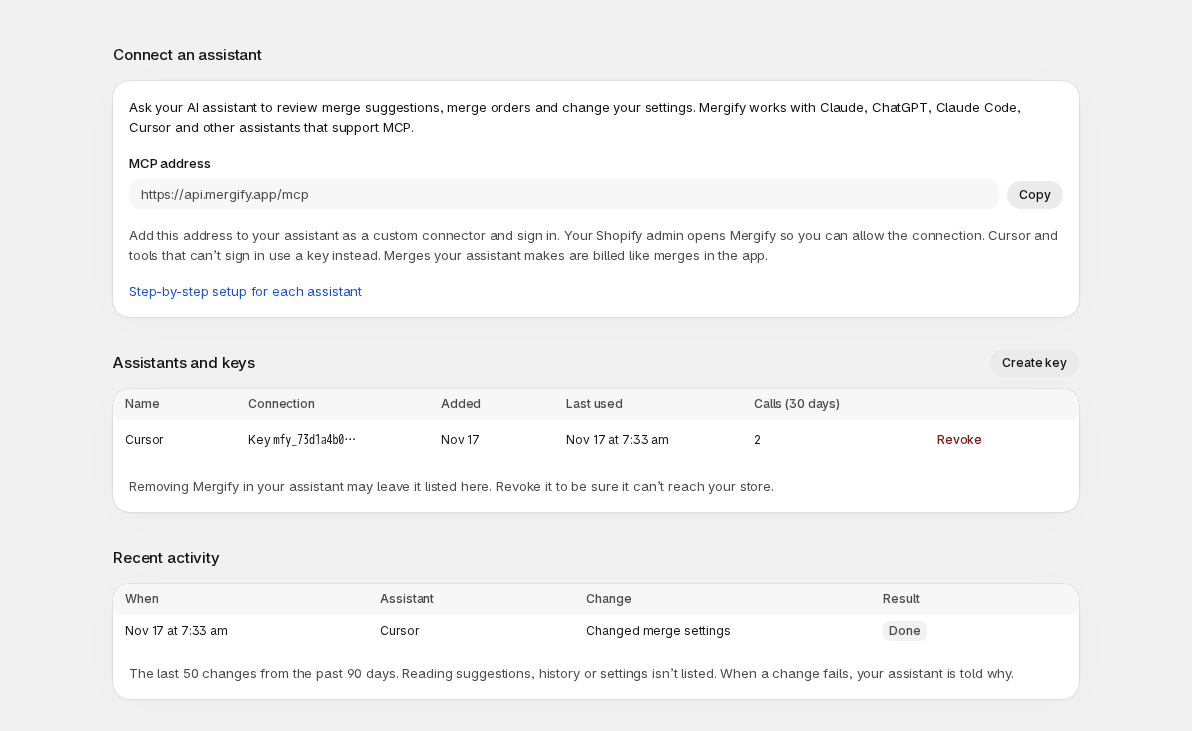
Add it to your assistant and sign in. Your Shopify admin opens Mergify on a page named Connect an assistant. It says which assistant is asking and which store it would work on (“Claude wants to use Mergify on your-store.myshopify.com”), and lists what it will be able to do:
- read merge suggestions and your merge history;
- preview and run merges (billed like any merge);
- read and change your settings, rules, auto-merge, emails and integrations;
- choose or cancel your plan.
It also says where you go back to afterwards (“an app on this computer” when the assistant runs on your computer).
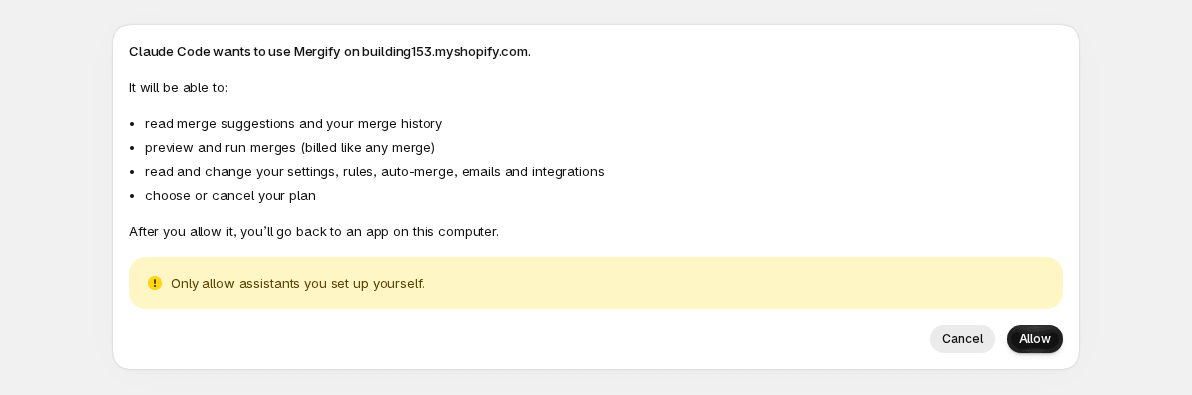
Select Allow to connect, or Cancel to refuse. Check that the store named is the one you meant before you allow it. Any staff member who can open Mergify in the store can approve. The assistant then works on that store, and its merges are billed as in the app.
An approval link works once and expires after 10 minutes. If the page says This link has expired or was already used. Start again from your assistant., start the connection again from your assistant.
If you have several stores
Section titled “If you have several stores”One approval connects one store: the store whose Mergify you approve in. Mergify’s link to your Shopify admin doesn’t name a store, so it can open on a store other than the one you meant. Read the store named on Connect an assistant before you select Allow.
- Wrong store. Select Cancel, switch to the right store in your Shopify admin, and start the connection again from your assistant.
- Another store. Start the connection again from your assistant while your Shopify admin is on that store, and approve it there. Each store has its own connection, and an assistant connection works on one store only. Whether your assistant keeps two Mergify connections side by side depends on the assistant. If it doesn’t, use a key for each store (see Connect with a key).
Claude.ai
Section titled “Claude.ai”- Go to Customize > Connectors, click + Add, then Add custom connector. On Team and Enterprise plans an organization owner adds the connector first, under Organization settings > Connectors, and each member then clicks Connect on it.
- Enter a name and the address, then click Continue (if the dialog shows it).
- Keep the sign-in options Claude marks Detected, with OAuth client left on its default, then click Add.
- Click Connect if it shows, sign in, and select Allow in Mergify.
ChatGPT
Section titled “ChatGPT”- On the web, open chatgpt.com/plugins, click the plus button, then Add custom MCP server.
- Enter a name and the address under Connection, choose OAuth for authentication, confirm the warning and click Create as a plugin.
- Install the plugin, then sign in when ChatGPT asks and select Allow in Mergify.
Your workspace’s permissions can restrict custom servers.
Claude Code
Section titled “Claude Code”claude mcp add --transport http mergify https://api.mergify.app/mcpThen start Claude Code, run /mcp, select mergify and follow the steps in your browser.
Connect with a key
Section titled “Connect with a key”Use a key for tools that can’t sign in (the Messages API connector, scripts), and to connect Cursor. On Settings › AI assistant, select Create key, name it (for example “Cursor on my laptop”) and select Create. The next window, Copy your key, shows the key once: select Copy and save it in a password manager, because you can’t see it again. Anyone who has the key can use your store through Mergify as an assistant can, so treat it like a password. You can revoke a key at any time (see Disconnect), and the next call with it fails.
-
Claude.ai: in the connector’s Request headers, add
Authorizationwith the valueBearer <your key>(this setting isn’t available to every Claude organization). -
Claude Code:
claude mcp add --transport http mergify https://api.mergify.app/mcp --header "Authorization: Bearer <your key>" -
Cursor, in
mcp.json:{"mcpServers": {"mergify": {"url": "https://api.mergify.app/mcp","headers": { "Authorization": "Bearer <your key>" }}}}
Disconnect
Section titled “Disconnect”On Settings › AI assistant, find the assistant or key under Assistants and keys and select Revoke, then confirm. The assistant’s next call fails and it asks you to sign in again. Mergify support can revoke a connection or a key for you too.
Removing Mergify in your assistant (Claude.ai: Customize > Connectors; Claude Code: Clear authentication in /mcp) may leave it listed on that page. Revoke it there to be sure it can’t reach your store.
Connecting the same assistant again makes a new connection. The old one stays listed until you revoke it or it goes 90 days without use.
See what your assistant changed
Section titled “See what your assistant changed”Recent activity on Settings › AI assistant lists the last 50 changes your assistants made in the past 90 days, newest first: when, which assistant, what it changed and whether it worked (Done or Failed). A merge your assistant started links to its entry in History.
Reading suggestions, history or settings isn’t listed, and neither is a merge that didn’t start (for example one blocked by your usage cap). The list doesn’t say why a change failed: your assistant is told why.
Uninstalling Mergify disconnects every assistant and revokes every key. After a reinstall, connect the assistant again, or create a new key on Settings › AI assistant if you used one.
Privacy
Section titled “Privacy”Your assistant’s provider (Anthropic, OpenAI, Cursor and so on) sees what you type into it and what Mergify’s tools answer, including order details.